Internet Security 2010 Malware Virus Removal
The Internet Security 2010 (IS2010) malware virus is getting a head start on the new year.
Like many malware programs of this ilk, this program tries to present itself as antivirus software, hoping that people will think it’s legitimate and actually pay money to install it.
The software looks very official, using a Microsoft-esque shield logo and kind of copying the colors used by AVG. It even shows a screen of supposed virus infections on your system. All fake, of course.
One symptom of the software is that it will disable the task manager and also redefines the DOS command prompt. When you try to run the DOS prompt, will actually invoke the IS 2010 software.
Here’s what I did to get rid of Internet Security 2010:
1) First, I made sure I had a current backup of any important files. Pictures, documents, music, etc.
2) Boot into Safe mode. You can do this by pressing the F8 during power up. You may have to press F8 a few times to get this just right. When you do, you’ll see a black screen with various options. Pick Safe Mode with Networking which is usually the second from the top.
3) Open your browser and get these two programs. Malwarebytes Anti-Malware and Hijackthis.
http://www.malwarebytes.org/
http://free.antivirus.com/hijackthis/
4) Install and run Malwarebytes. Go to the update tab and get the lateste update. Go to the scan tab and do a Quick Scan. This will usually remove most of the malware.
5) Next, install and Run Hijackthis. Look for references to windowsupdate86 and IS2010 and remove them. Be careful of what you remove here since you can actually cripple your system if you remove the wrong items.
6) Reboot into Safe Mode.
7) Run msconfig and remove any items that look like IS2010 or Internet Security 2010.
8) Open Windows Explorer and remove the folder c:\program files\internet security 2010 or c:\program files\IS2010.
9) Go to Start > Run and type in regedit. Do a search for Internet Security 2010. Remove any references.
10) Reboot to Safe Mode.
11) Run Malwarebytes once more, doing a FULL scan.
This should clean out Internet Security 2010.
Antivir and Malwarebytes Not Updating
Filed under: How To Get Antivir To Update, How To Get Malwarebytes Antimalware To Update
Recently I noticed on several different computers that both Antivir and Malwarebyte’s AntiMalware were not able to update.
I found a good posting on the AntiVir forum that described how to get the updates for both programs to work.
Basically the problem is due to a driver 32 virus. You can manually remove the virus by navigating to HKEY_LOCAL_MACHINE\SOFTWARE\Microsoft\Windows NT\CurrentVersion\Drivers32 and then deleting the key that has a “..” in the value.
To read more about it, check out this post:
http://forum.avira.com/wbb/index.php?page=Thread&threadID=90274
My Pick For Best Spam Filter
I’ve used a lot of spam filters — both free and paid — and for the money my recommendation for the best email spam filter would be Cloudmark.
There are basically three types of spam filtering.
1. Blacklist / Keyword filter
This is the oldest and simplest type of spam detection. You set up a list of bad email addresses and / or bad keywords and if the email contains any of them then it gets flagged as spam.
2. Heuristic Detection
Most modern spam detection programs use heuristic algorithms to “learn” patterns as to what is considered to be a spam email.
Over time the program learns about spam and detection rates and accuracy goes up.
3. Group Consensus
Cloudmark uses a unique type of spam detection. It is based upon the notion that other people have probably received the same spam email so the Cloudmark software is in constant contact with a centralized spam database.
It works remarkably well and what I like best about Cloudmark is the very simple interface and that it is relatively lightweight.
Other spam filtering software I’ve used are often very slow and intrusive to the email program. More than one spam filtering program I’ve used actually locked up my Outlook and I had to uninstall the program to get my email working again.
Currently Cloudmark goes for about $40 / year and that allows you to install it on two computers.
You can try out Cloudmark for a 15 day free trial at their website www.cloudmark.com.
Removing Udchniv and Atthdop Spyware
Filed under: How To Remove Atthdop.exe, How To Remove Udcniv.exe
These two particular strains of spyware have an interesting defense strategy. However, let me first describe the symptoms of these spyware programs.
1) Add / Remove Programs closes after a few seconds.
2) msconfig and regedit programs close after a few seconds.
3) Google search for keywords like SuperAntiSpyware and udchniv causes the Internet Explorer browser to close.
4) Attempting to run Malwarebyte’s mbab-setup.exe program does nothing.
5) Attempting to run SuperAntiSpyware installation or application either fails or causes some kind of system error.
If you notice these systems on your computer, then you may have been infected with udchniv or atthdop.
The good news is that they are easy to cleanup with Malwarebyte’s Anti-Malware. However, you have to do a couple of tricks to outsmart the spyware.
First, you need to rename the mbab-setup.exe program to something else like abc.exe. This is because the spyware is actively running and causes mbab-setup.exe to abort. By renaming the setup program you can get around this defense.
Second, once Mal’s program is installed you also have to rename the application file. This is located at C:\Program Files\Malwarebytes’ Anti-Malware\.
The file you need to rename is mbab.exe. Rename it to something like xyz.exe and then run that program. This will allow you to run the full Malwarebyte’s Anti-Malware program which is able to remove the udcniv and atthdop spyware.
If after running Mal’s you still have problems, repeat the same technique with SuperAntiSpyware and spyware should be removed completely.
More How To Remove Antivirus 2009 and TDSS Rootkit
Filed under: How To Remove MS Antivirus 2009, How To Remove TDSS Rootkit
In my previous posting on How To Remove MS Antivirus 2009 I mentioned using Malwarebyte’s Anti-Malware Removal Tool along with running SuperAntivirus. These are both excellent spyware cleaners.
However, you may run into a few “gotchas” that prevent you from running these cleaning programs. Here’s how you can get around those problems, which are based on my first hand experience from cleaning one instance of MS Antivirus 2009 on a single PC.
Problem #1 — Unable to run Malwarebyte’s mbab-setup.exe program.
On this particular PC I kept clicking on the setup icon and nothing happened. I found out that this was because the spyware program was blocking execution of the antispyware installation file. Man, these spyware programs are getting more and more devious all the time!
To get around this I just renamed the mbab-setup.exe program to fred.exe and I was able to install the program. However, I could still only install the program from Safe mode.
Problem #2 — Unable to run Malwarebyte’s Anti-Malware program.
Once I booted to Safe mode and was able to install Mal’s program, I wasn’t able to RUN the program. This was because the spyware was also blocking that application filename as well.
So I navigated to c:\program files\malwarebyte’s antimalware and renamed the application file mbab.exe to fred.exe. Same trick as before.
Now the application ran, although this time I had to run the application from Normal mode and NOT Safe mode! Sheesh…what gyrations!
Program #3 — Browser is hijacked.
After running Mal’s Anti-Malware which caught a lot infections, I wanted to install SuperAntivirus. However, the browser was hijacked and would not let me navigate to the correct URL.
I decided to run Mal’s program a few more times from Normal mode and after about the third time if revealed that the PC had the TDSServ Rootkit virus.
Mal’s was able to clean up most of the TDSS infection. However, I had to manually navigate to c:\windows\system32 to manually delete the remaining TDSSxxxx files.
Once that was done, the browser seemed to be back to normal.
I ran SuperAntivirus from both Normal and Safe mode and also ran Mal’s from Safe mode — which was now working again — and everything finally came up clean.
How To Keep Your Computer Clean
In my previous post I showed some pictures of computers that were clogged with dirt and dust. In some cases, so much dust that it was very likely to cause the computer to either burn out or at the very least, to cause intermittent problems.
Now the reason why you want to keep your computer clean isn’t really for aesthetic purposes. The main reason you want to keep your computer physically clean is that dirt and dust causes both a build up of heat as well as potential short circuits as the dust settles into electrical portions of your computer like the power supply, ports, and the motherboard itself.
And once you get a short circuit it’s often a fatal disease. Time for a new computer! That costs a bit of coin, as well as the time and added cost of having to reinstall all your programs and restore your data, provided your hard drive even survived the ordeal.
Now wouldn’t you rather spend that money on a couple of dinners at Mastros instead? OK, at Mastros maybe it’s just an appetizer and one dinner…
So how do you keep your computer clean and free from dust?
The best way I’ve found is to use a can of compressed air or Dust Off.
You should also use some eye protection like safety goggles or eye glasses along with a dust mask. I’ve found that the dust that settles on computers is often a very fine type of dust and it easily gets into your eyes and nose if you aren’t wearing any protection.
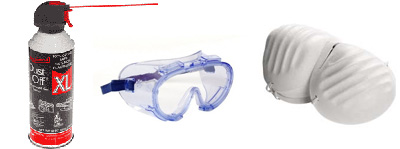
When blowing the dust out of the ports, it’s best to use short quick bursts. Also, don’t aim the air directly into the port. Blow the dust out at an angle.
Be careful that you don’t hold that plastic straw nozzle too close to any part of the computer, otherwise it’ll get frostbite and that could damage the components. For best results, hold the nozzle about 3 – 6 inches away from the area that you are trying to clean.
Sometimes people think using a vacuum cleaner is better than the compressed air. A lot of vacuum cleaners come with crevice attachments or other brush heads and the problem is that the plastic can cause a large build up of static electricity which can damage delicate electronic components.
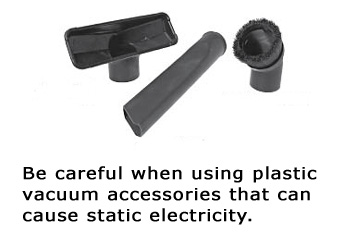
My recommendation is to use the compressed air which is less risky.
The Computer Who Wore A Beard
At first I was going to title this post “Psst! Wanna See Some Dirty Computer Pictures?”
I thought that might be a bit too risqué so I decided to tone it down bit.
Be that as it may, this post DOES have to do with dirty computer pictures.
Here some some unretouched pictures of computers that I have encountered over the past year. Click on the photos — if you dare — to see more of the dirty details…
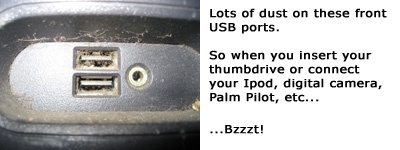
This first picture shows a lot of dust collecting on the front USB ports. These ports are often located near the bottom of the computer so they are in the prime location for collecting dust mites, pet hair, cracker crumbs, and just about anything that falls on the floor.
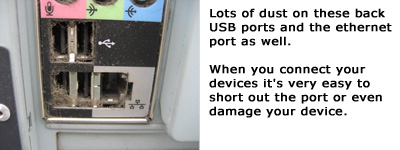
This second picture shows more dust, this time on the back of the computer. You know, the place against the wall that no one ever cleans?
Usually the ethernet ports are on the back of the computer so this is another good place for the ports to collect dust and short out.
Ever wonder why your internet connection is intermittent? It could be all that dust clogging the ethernet port and causing electrical shorts.
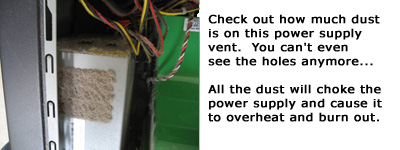
Here’s a picture of another computer’s power supply. All the dust is clogging the air vents which causes the power supply to overheat and burn out.
And when a power supply burns out it could short out the whole computer, destroying the main computer board and possibly even the computer hard drive. *Ouch!*
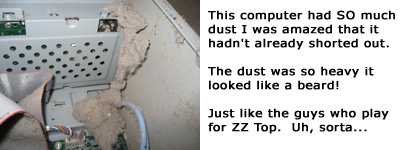
I think this photo is the ultimate in dirty computer pictures. So much dust has collected on the inside of the computer it grows down like a beard.
And a final pictoral homage to ZZ Top:
ZZTop, Computer Beard, ZZ Top-Computer Beard Combo.

Check out the next post to see what you can do about keeping your computer free from dust and beards. Unless you REALLY dig ZZ Top…
How To Remove MS Antivirus 2009
In the last 3 months I have seen at least 5 cases of Antivirus 2008, Antivirus 2009, or MS Antivirus 2009 infecting my client’s computers.
Apparently this same spyware also goes by the name of Vitae Antivirus 2008 and Vista Antivirus 2008.
You’ll recognize it by the multicolored shield they use which tries to make you think it is an official Microsoft Windows product.

The spyware puts out a lot of annoying fake virus detection messages and like all spyware this Antivirus spyware is basically a big pain the arse.
What I have found to be the best way to remove these current infestations of Antivirus 2008, 2009, and their MS Antivirus variants is to use the free spyware cleaner found at Malwarebyte’s Anti-Malware site:
http://www.malwarebytes.org/mbam.php
Once I download and install the software I usually run a quick scan first, just to see if that reduces the popups.
If it looks promising then I run the full scan which does a “deep cleaning.” The full scan can take several hours, depending upon the number of files on the hard drive so I usually plan on taking a long break while the scan is running.
In most cases Malwarebyte’s cleaner does a good job of removing the MS Antivirus 2009 spyware.
However, for good measure I also tend to run another cleaner called SuperAntiSpyare found at this site:
http://www.superantispyware.com/
It also has a quick mode and a deeper cleaning mode. I tend to run the quick mode first and if it finds any spyware then I run the deeper cleaning mode as well.


