Cannot Install HP 1102W Printer Driver on Windows 10
Filed under: How To Install HP 1102W Printer Driver on Windows 10
After downloading the official driver software from the HP site, the software will not install. After clicking on the EXE nothing happens. The solution is to check the C: drive for a directory like this: C:\LJP1100_P1560_P1600_Full_Solution. In the folder run the HpSetup.exe file and the installation will work OK. There apparently is some bug that extracts the files to the directory however it does not go to the next step to actually run the setup.
Doh!
Playing iTunes Music on Android Phones
If you have iTunes on a PC or Mac and want to play your music on an Android phone, then a common way to do this is to upload your iTunes music to the Google Play Music cloud and then use Google Play on your Android phone to play the music.
On your PC: Download Google Music Manager and use it to upload your iTunes Music.
On your Android Phone: Run the Google Play Music app to play your music.
https://www.androidpit.com/itunes-and-android-how-to-sync
Kernelbase.DLL Error Causing IE To Fail
If your IE fails to load or if it has a hard time loading websites, it may be due to either a bad add-on or a Shockwave installation.
The Shockwave installation problem can be a bit deceiving because you think the issue is with the browser add-ons or a BHO. However, if all else fails then try uninstalling Shockwave or Flash before you do a complete repair or OS reinstall.
Fake Tech Support Screen Lockup
Filed under: How To Remove Fake Tech Support Lockup Screen
A client recently made the mistake of Googling a customer support number for Gmail and letting a fake tech support guy access her computer.
After allowing the faker to access her computer — he used the remote access program Supremo — she got worried when he asked for money so she hung up on him.
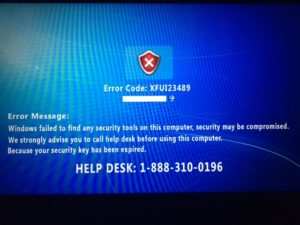
Unfortunately the faker already installed a virus program on her computer so when she rebooted it came up with the following screen.
It covered the entired desktop so access to the normal desktop program icons was not possible.
Control-Alt-Delete would bring up the task window although the Task Manager itself was disabled so I couldn’t kill the program that was covering the desktop.
Although running the Task Manager would fail, it did allow me to access the toolbar so I thought I could run programs like regedit or gpedit.msc to kill the desktop task.
However when running the program they would not show up because somehow the desktop screen was controlling the desktop space.
Booting to Safe mode seemed to work OK so I was pretty sure the virus was installed as some kind of start up program or task.
In Safe mode I installed RKill and Autoruns. I then made a shortcut to the programs and added them to the Favorites so I could access them even if the desktop virus was running.
After booting normally — and getting the desktop virus — I ran RKill which detected the registry entry that disabled the task manager. After fixing the registry entry I could run the Task Manager and noticed Defender was running which I thought was odd because I typically don’t install that program. After killing that Defender task the desktop virus disappeared immediately and I could see the normal desktop again so I knew the Defender program was the main culprit.
I then ran Autoruns which showed that the fake Defender program was running as a startup task. Instead of Windows Defender the virus was called MS Defender. I removed that as a start up task and now the computer is back to normal.
How To Whiten Teeth In Photoshop
This is one of the better videos on how to whiten teeth in Photoshop.
Find What’s Loading On Startup With Autoruns by Sysinternals
Filed under: How To See What Programs Are Being Loaded On Startup
Microsoft has a fantastic set of diagnostic tools at http://www.sysinternals.com. A very useful utility in that set is called Autoruns and it shows what programs are automatically loaded when yous start your computer. This can be especially helpful if you happen to see an odd DLL file being loaded and you’re not sure which program is calling it.
Docking Stations a KVM Alternative
I learned something new from a client’s configuration today. Up to now, I’ve always thought that in order to use an external keyboard, video, and mouse with a laptop you would need some kind of KVM adapter. It would need at the very least a video output and a USB from the laptop.
However, my client had a Toshiba Dynadock which required just a USB connection. Somehow the laptop could route the video, keyboard and mouse all through that one port. In addition, it also handles her ethernet and printer connection as well. All through the one USB port.
Installation for the Toshiba Dynadock was amazingly simple on her new Windows 10 Acer laptop. Just plug it in and the system installed all the drivers. Didn’t even need to download any software from their website.
Apparently these USB docking stations have been around for awhile so it must have slipped past my tech gear radar. These docking stations are also used for managing dual monitors so which I’m starting to see more for my small business clients.
Just go to Amazon and search on USB Docking Stations for more choices.
Flash Drive “You don’t currently have permission…” Error
Filed under: How To Fix You Don't Have Permission Error on USB Flash Drives
Ran into a frustrating problem recently on my own computer. I found that I was not able to read external drives or flash drives from any of my USB ports. Interestingly enough, my wireless mouse was OK and it used a USB port for the mouse transceiver.
The error I got when trying to read from a flash drive was:
“You don’t currently have permission to access this folder. Click Continue to permanently get access to this folder.”
After clicking Continue I got:
“You have been denied permission to access this folder. To gain access to this folder you will need to use the security tab.”
My flash drive didn’t have that security tab which I later found out was because my flash drive was formatted as FAT rather than NTFS.
A lot of posts said to do things like play with the GPO, run USB drive cleaners, uninstall / reinstall the USB drivers, etc.
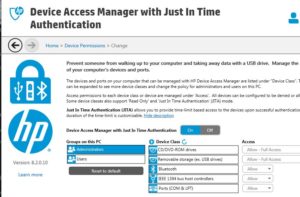
At the end of the day, I found the problem to be caused by the HP Client Security. It has a setting that can be changed to allow for full access to the USB drives. Still not 100% on how I triggered it. However, after changing the setting to full access everything is working again.
Windows 7 Stuck On Updating
After trying the multitude of suggestions on how to get Windows 7 to update, the sequence described here is the only one that worked for me.
http://superuser.com/questions/951960/windows-7-sp1-windows-update-stuck-checking-for-updates
I’ll repeat the steps here with the links in case the content above moves:
1) Install SP1 for your machine.
2) Download KB-3138612 and save it where you can find it later
https://support.microsoft.com/en-us/kb/3138612
3) Download SUR Tool save it to same place
http://windows.microsoft.com/en-us/windows7/what-is-the-system-update-readiness-tool
Restart the PC and disconnect from internet before Windows loads, this is important because at every boot windows will check for updates in the background and this will start the checking for updates hang all over again and will prevent the install of the downloaded packages until it finishes checking, so disconnecting from the internet before Windows loads prevents this.
Once booted install KB-3138612, if reboot is required do so and stay disconnected from internet.
Now install the SUR Tool package, this is a big package and will install many updates along with cleaning up and repairing the Windows update store. It will also cut down on how many more Windows updates will need to be installed later.
After install of SUR package reboot, connect to internet and do a manual Windows Update, it should work much faster now. Even after these fixes I have seen some W7 PC’s take up to an hour to finish checking for updates if launched from Control Panel manually.
If you have other Windows updates issues and the 2 updates above are installed, download this Microsoft Windows Update fixit tool (right click “save link as”) run it and select aggressive mode to completely reset Windows updates. Reboot and try Windows Updates from the Control Panel again.
http://go.microsoft.com/?linkid=9665683
Prevent Windows 10 From Installing
Filed under: How To Prevent Windows 10 From Automatically Installing
Run this utility from well-respected computer authority Steve Gibson:
https://www.grc.com/never10.htm
It will disable automatic installation of Windows 10. You can always re-enable the automatic installation of Windows 10 by rerunning the program.


